Last week I shared a little sneak peek into the Roses and Ribbons DIY series which I put together alongside a few fabulous San Francisco wedding vendors during my short but sweet time out there.
And today I'm excited to share the first of many simple, cheap and chic DIY tutorials that will be gracing your computer screens every Friday over the next few weeks.
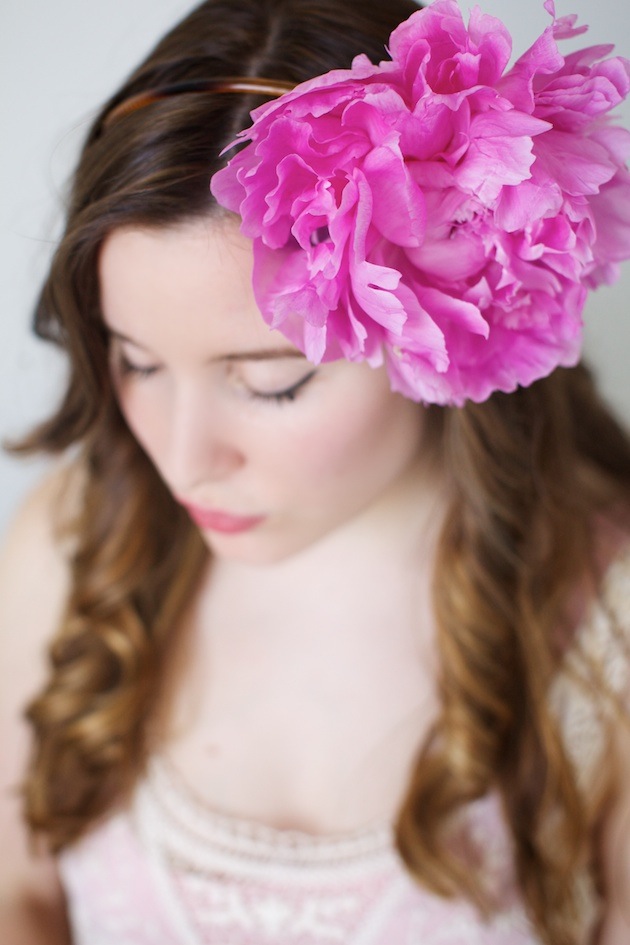
*Disclaimer* There's not actually any roses or ribbons involved in today's tutorial, just one gigantic, hot pink peony in full bloom!

As I mentioned in my previous post, the inspiration for this DIY came from the florist, Karen, of Huckleberry Karen Designs. When I first met her she had accessorized her smart / casual outfit with a glorious and very REAL peony. She looked amazing and I was blown away by her creativity.
Using real floral hair accessories is something I didn't even consider for my own wedding back in August 2010 but after featuring these unique hairbands and accessories (also created by Karen) for this stunning inspiration shoot, I'm officially obsessed.
Make A Statement
Peony hair bands are perfect for brides looking for a statement hairpiece ~ I love the jaunty, romantic and whimsical air about them. They'd also make a seriously chic hair accessory for your bridesmaids. Just imagine 3, 4, 5 pretty peonies all in a row!
Or they'd be a fabulous option for wedding guests, mothers of the bride / groom or for any event where you want to look a little bit more fancy ~ instead of a feathery fascinator or a faux flower, why not don a real flower?!

Over to Huckleberry Karen Designs for her DIY tutorial…and honestly, you're not going to believe how simple it is!
Many thanks to Jessie of Simply Jessie Photography for taking these helpful step by step photos and for making me look pretty. And you see that aged, grainy wood where the tools are laid out? That is an utterly exquisite vintage table from One True Love Vintage Rentals.
(Yes, I was surprised Amanda, let us near it with a hot glue gun too but thankfully there were no mishaps!)
How To Make A DIY Peony Hair Band
Supplies:
Plastic headband of your choice
1 large peony (or large flower head)
A couple of stems of foliage (we used dusty miller but you can choose any greenery or none at all)
1 felt circle cut into 1.5 – 2 inches in diameter*
1 cardboard or very thick cardstock cut into 1.5-2 inches in diameter*
Fresh Floral adhesive
Hot glue gun
Floral Clippers
* The diameter depends on how large your flower is. If it’s big then the circle should be bigger.


1. First prepare your flowers and greenery. Cut the peony head down so there is no stem. Make it as flat as possible. Trim your green foliage to the length you would like. Play around with the layout and see how much you want the greenery to show.
2. Then take the cardboard circle and put a generous amount of floral adhesive on the edge you want your foliage to lie.

3. Place foliage on top of the glue. Make sure that the foliage will show once you place the peony on top. Wait a few minutes for the glue to dry.
4. In the center of the cardboard circle place another generous amount of floral adhesive. This is where the peony or large flower will be
placed.
5. Place the peony (or flower) on top of the glue and hold it down securely. It takes a while for the glue to dry so leave it for 20-30 minutes. During this time you can plug in your hot glue gun to warm up.

6. Once the glue is dry (you can use a blow dryer to speed up the process but be careful not to blow too long on your flower) you are ready to
attach it to your headband.
7. Take your headband and decide where you want to place the flower. Some people want it slightly left or right. Find your preference and
decide where the flower looks best.
8. Take your peony with the foliage and the felt circle. Dab a generous amount on the back of the cardboard and then sandwich the headband between the cardboard and circle felt. Do this quickly because the glue gun dries quickly. (The reason for attaching felt to the inside of the band is for comfort ~ to have something soft against your head.)


9. Secure tightly and check to see if you need to add some more hot glue to get the edges. If your peony is not secured enough you can use a little of the hot glue gun around the edges and secure more.
10. Place on head and bask in the glory of your talent! You will receive a lot of compliments!
We created one hairband with foliage and one without to show you the difference.

All photos by the fantastic Simply Jessie Photography
I like the simplicity of a single flower but I actually prefer it with a few springs of grey, velvety dusty miller. What do you think?
Top tips:
~ To avoid wilting, these headbands need to be made on the morning of your event ~ if you're wearing one on your wedding day, make sure it's one of the last things you do when getting ready.
~ When choosing your headband, consider whether you want it to blend in with your hair colour or if you'd like the band to be more prominent.
~Think carefully about what side of your head you'd like your flower on and which way round you'd like your flower and foliage to sit as once it's glued, it's not coming off!
~ Once you're confident with one large flower you could get creative and use a variety of flowers in different shapes, colours and sizes, like Karen did for this shoot:

Gorgeous huh? Photo by Love Life Studios. See the full stunning shoot here.
The fancy real floral possibilities are endless!
(Just bare in mind that the more flowers you attach, the heavier your hair band will be and therefore the less comfortable.)
All these gorgeous photos can't fully convey how beautiful the hairbands look (and smell) in person but trust me, when you have a hot pink peony sitting ontop of your head, you can't help but feel rather special.
So hands up who's going to give this floral DIY a whirl?
And where would you wear your peony hair band?
Karen, Jessie and I would love to hear from you! Please let us know if you have any questions about this DIY, we're more than happy to help. xx
~ More DIY Tutorials on Bridal Musings ~
follow the latest musings: Twitter | Facebook | Instagram | Pinterest | Google+