Woo-hoo! It's Friday!
Time for another installment of our Roses and Ribbons DIY series. If you missed the first part click here to find out about all the awesome vendors involved and if you like peonies, you'll LOVE this Real Peony Headband DIY.
There was a lot of love for last week's DIY project on Twitter and Facebook so thanks for all the sweet comments ~ it's always so wonderful to hear from you guys!
Today's faux ribbon DIY project is super easy and cheap as chips ~ just how I like 'em.
I was inspired by this creative love note idea on Papersnitch and thought it'd make a really cute way for brides to ask their friends/sisters to be their bridesmaids.

Such a sweet concept ~ unravelling a message provides an element of surprise. Just imagine their faces when they figure out what it says?
It's a step up from a card but not too time consuming or expensive considering that the average bride has around 5 bridesmaids.
I adapted the project above by hand writing the message to add even more of a personal touch. It resulted in a rough and ready kind of DIY but I like to think that's just part of it's charm!
Supplies:
Quater of a yard of cotton material (the more bridesmaids you have the more material you'll need)
1 fine tipped Sharpie, fabric pen or metallic gold/silver pen
Plastic / wooden spool (1 for each bridesmaid)
Ruler
Scissors
Glue Gun
Ruler
Small gift box (1 for each bridesmaid)
Pretty trimming to decorate the box inside and out eg. material, buttons, confetti, tissue paper, ribbon

Preparation:
Most fabric shops have scrap bins full of cheap material ~ check these out and, if possible, ask to test your pen on a corner of fabric similar to the one you'll be using. Some pens can bleed on particular materials so it's definitely worth trying before you buy.
Also be sure to ask in fabric shops if they have any spare plastic or wooden thread/ribbon spools hanging around. The fabric shop I went to (Britex in San Francisco) had actually thrown a whole box of spools out the day before I visited!

Step 1. Check the width of your spool against your material. Make sure it's a little thinner than the space on the spool so it will wrap around easily. Mark the width with a pencil and continue to mark off as many pieces as you need according to how many bridesmaids you have.
Step 2. Make a slit using scissors at the first mark and pull material in either direction so it rips. Cotton should rip easily but if your material doesn't (or you don't like the rough around the edges ripped look) simply cut in a straight line. You might like to draw a line in pencil to help guide you.


Step 3. Once you have a long strip of material, decide what way round you'd like the colour/pattern of your material to face (bear in mind you'll be writing your message on the ‘inside'). Then put a small amount of glue on the spool and attach the material to it, wrap it around for 1-2 rotations then this is where you will start to write.
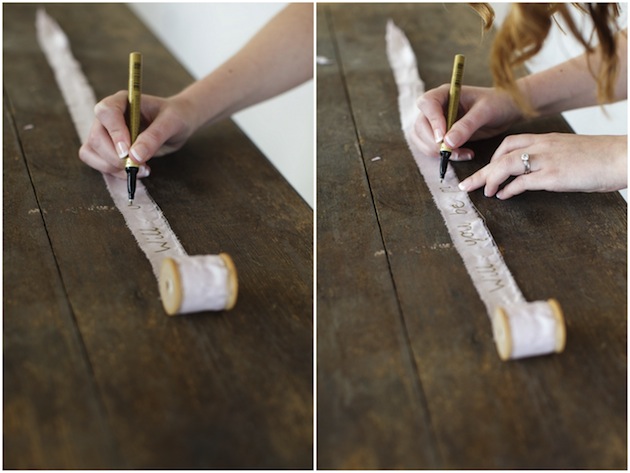
Step 4. Hold the ribbon taught and carefully write your message:
Will you be my bridesmaid?
Step 5. Wait for it to dry completely then wrap it around the spool until you can't see the words anymore, leave a few inches gap at the end and cut any remaining material off.

Step 6. To present it to your bridesmaids, put it in a small gift box (we put floral material in our box to jazz it up a bit, you could use tissue paper or confetti inside).
Write a little note such as ‘unravel me' or ‘open me'. Pop the lid on and wrap the box in pretty ribbon (we used velvet with a few springs of lavender and pure white lace as an alternative gift wrap idea).
Step 7. Repeat.

Et voila! A super easy and sweet way to ask your best girls to be your bridesmaids.

Top Tips:
~ Use alphabet stamps to stamp your message on a ribbon / piece of material if you don't think your handwriting is up to scratch.
~ You could also use this idea for save the dates for your closest family and friends or a Valentine's day gift to your beloved.
~ Why not use a different colour / patterned material for your each of your bridesmaids according to their personalities / favourite colours.

So do you like the thought of this faux ribbon unravelling DIY project?
Are any of you asking your friends/sisters to be your bridesmaids in a special way?
As always I'd love to hear from you!
~ More DIY Tutorials on Bridal Musings + More from the Roses & Ribbons DIY Series ~
follow the latest musings: Twitter | Facebook | Instagram | Pinterest | Google+
Photographer: Simply Jessie Photography / Floral Designer: Huckleberry Karen Designs / Rental Furniture: One True Love Vintage Rentals