Pretty shoes and pom poms are a match made in heaven, if you ask me.
So here's a darling DIY project for you to get your crafty hands on and your pedicured feet into.
Pom pom shoe clips are perfect for weddings, parties or those days when you want to add a little extra fanciness (and fun) to your step!
With a bit of chiffon in your favourite hue(s) and a steady hand you can make your very own pom pom shoe clips.

A CRAFTY COLLABORATION
Ninette Van Kamp of Wake Up and Make Love (it's an awesome name isn't it?) creates the cutest wedding favours, stationery and accessories you ever did see. She also designs gorgeous lingerie and garters and holds regular craft workshops at Homemade London to teach brides to be, hen parties and crafty folk how to make them.
In fact, Homemade London kindly let us use their colourful and creative space for our DIY projects (yes, plural – stay tuned as we have another project to share that'll be coming to your computer screens in a couple of weeks!)
Talented London wedding photographer, and all round lovely lady, Kat Hill, was on hand to take pretty photos for us too.
Read on for the full (and very detailed) tutorial…
DIY SHOE CLIP TOOLKIT

You will need…
– Polyester Chiffon (1/2 Metre)
– Scissors
– A Pencil
– Small Piece Of Thick Card
– Shoe Clip Blanks (you can get them at fabric stores, we got ours from Etsy)
– Needle
– Thread
– Glue Gun
DIY SHOE CLIPS TUTORIAL
Step 1. Fold your length of chiffon into a square or rectangle shape (as if you were folding a towel / bed sheet) fold in half, then half again and so on until you end up with lots of layers of chiffon one on top of the other.
Step 2. Draw a circle in pencil on the top layer of chiffon according to how large you want your pom pom to be.
We drew around a reel of ribbon, you could draw around a coffee mug or a side plate.

Step 3. Use a few pins to gather the chiffon together in the centre so that it is secure (making it much easier to cut the fabric).
Then carefully cut around the circle – you will end up with lots of chiffon circles.


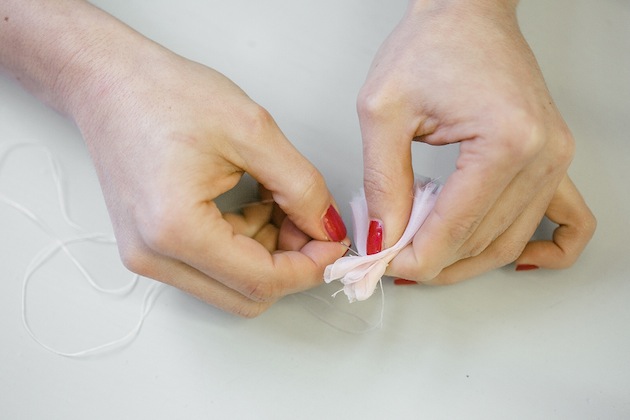
Step 4. Fold each chiffon circle in half and half again and again to create layered triangles and pinch them at the bottom to hold the shape.


Step 5. Do a few stitches near the bottom of the triangles with a needle and thread (using the same or a similar colour to your chiffon fabric) then tie a knot to keep them tightly bound together.
Don't worry, these stitches don't have to be neat as you won't see them once the pom is opened up.
Then repeat and stitch four or five triangles together at the bottom.

Keep repeating these steps and adding new layers to your pom.


Step 6. Use more or less layers depending how fluffy and full you'd like your poms to be.
Once you're happy with the fullness, fluff out the layers so that the pom looks domed on top.
Then cut off any excess fabric.

Step 7. Cut out a small circle out of thick card (big enough to cover the bottom surface of your pom) then use a glue gun to attach it to the fabric at the bottom of your pom.
FYI – This cardboard circle provides a flat, sturdy surface to attach the shoe clip blank to. (That's the metal part that has the clip mechanism.)


Step 8.Use the glue gun to secure the card circle to the shoe clip blank, ensuring that the clip part is facing outwards.


Step 9. Once the glue is dry and the clip is securely attached to the pom, do a little more ‘fluffing to ensure you're happy with the way the layers look.
Clip to the front of your shoe…et voila!
You've got yourself one pretty pom pom shoe clip.

Step 10. Repeat steps 1-9 to make a matching pom for your other shoe!


STEP BY STEP TUTORIAL
You all know by now that I love my ‘cut out and keep' / pinnable images, so here's an overview of the tutorial.

TIPS & TRICKS
– When I was making my shoe clip, I found it quite tricky to hold all the pieces of fabric together without them springing out of my hands. So I created lots of mini sections then stitched them together (as demonstrated in the tutorial above).
– Keep your stitches low down on each section so that they won't be visible when your pom is finished.
– Bear in mind that chiffon is prone to fraying, so the edges of your pom will look a little ‘undone' – but I actually think it looks really pretty!
– Don't like sewing? Use the glue gun to glue the sections together or try using a stapler. But remember chiffon is a very delicate fabric so gather as many layers as possible together before stapling then you'll only need a couple of staples. (As opposed to creating lots of mini sections).
– Once you're feeling confident you've got the technique down, why not try using different fabrics? Velvet or lace would make beautiful poms (although they won't look quite as springy or fluffy as chiffon and you may need to use more fabric to get the desired pom-tastic effect).
– If you'll be making a lot of pom poms – for example for your bridesmaids, create a circle template out of card that you can use over and over again.
– These cute pom pom clips can even be used as pretty hair accessories or lapel pins!

BUY or DIY?
If you're more of a buy kind of bride than a crafty DIY one, you can find similar pom pom shoe clips from various Etsy sellers and Dessy have some floral shoe clips in a wide range of colours. Bando used to do some really cute versions but you could always use their pom pom hair clips instead.
So dear sweet readers, I do hope you enjoyed this tutorial.
Please let me know how you get on or if you have any tips or tricks of your own to share.
As always I'd love to hear from you in the comments and on Facebook, Twitter and Pinterest…or your social media app of choice!
BIG thanks to Nin and Kat for lending their skills, talent and expertise to this project.
More DIY POSTS
– Buy Or DIY? Geronimo Giant Balloons + Tassels